CAA User Guide
Though the CAA portal is meant to be intuitive, the following guide is designed to assist its users on its usage. The guides have been unified for both new and existing members and streamlined to fewer total steps over previous years and each include reference images at the top to help visualize the process. The portal is meant for use by plan administrators and other entities who would file HIOS submissions, for those who fit this description, feel free to begin here. If you are instead a provider or patient, please press “Log in” above to locate your respective portal
User Guide
- To access the secure Sav-Rx CAA Portal please go to: https://www.savrx.com/?Link=CAA
- New users should follow the Registration Guide to create an account before proceeding
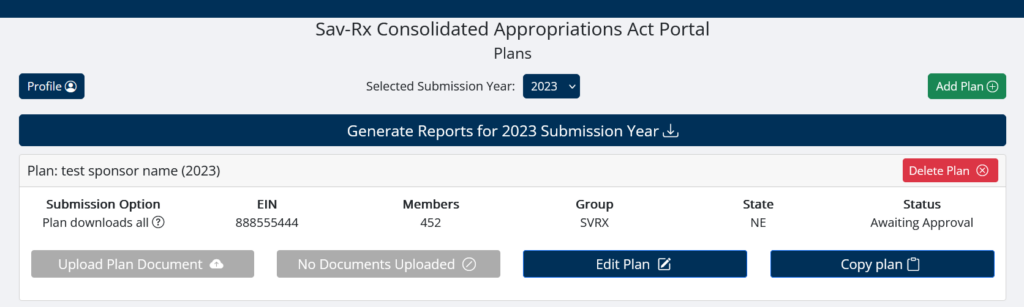
- Upon logging in, complete the Add Plan form (accessed via the green “add plan” button in the upper-right) for any plans not yet present in your profile for the current submission year. You will have the opportunity to review all values and the billing agreement before submitting a plan
- For newly created accounts this will be any plan not specified during registration
- For Existing members will need to create entries for the current submission year. You may use the “copy plan values” from previous submission years to use their values as a template (they can be edited before submission)
Note: It is important that the EIN is accurate to ensure CMS compliance. CMS submissions are based on EIN number so it is very important to register ALL Plans associated with each client. For example, you may have a retiree and non-retiree population. Each of those groups must be added into the registration
- Plans submitted will default to the “Awaiting Approval” submission status, during which time you may edit plan options with the “edit plan” button. Once a plan is approved (usually within 48 hours), you will be notified via email. Contacting your Sav-Rx account manager or CAA@savrx.com is required to make changes to approved plans
- To download your Rx files, click on “Generate Reports for 2025 Submission Year” (or whatever year happens to be selected). A zip file will be created with each of the pertinent files needed to support your CMS filing (P2, D3-D8 files, Narrative file, and a supplement to the Narrative). D1 and D2 templates are located here. Further actions will depend on your submission option:
- Option 1: No further action required on CAA portal. Use downloaded files to submit CMS filing
- Option 2: No further action required on CAA portal. Use downloaded files to submit plan and medical files to CMS. Sav-Rx will submit pharmacy files
- Option 3: Upload the D1 and Narrative Response (NR) files. Use downloaded files to submit medical files. Sav-Rx will submit plan and pharmacy files
- Option 4: Upload the D1, D2 and Narrative Response (NR) files. Sav-Rx will upload all files to CMS
Note: Submission Year 2023 includes 2022 data that will be submitted during calendar year 2023 to CMS. Submission Year 2022 includes 2020 and 2021 data.
- Sav-Rx CAA team will email the user a submission receipt upon completion of registration into HIOS for plans using submission options 2 through 4
Registration Guide
- From the log in screen, switch to the “Register” tab
- Complete Required Fields (asterisk *). This includes details of one of your plan sponsors. Further plans can be added via the portal once your account has been approved. You will be given an opportunity to review the billing agreement before submitting a plan
Note: All submission options are fee-based except “Plan Downloads Pharmacy Files”. Submission option descriptions are located at the bottom of the Registration and Add Plan forms - You should receive an email shortly with a link to confirm your email with the subject line “CAA Registration Verification”. Please check your spam folder if it does not arrive within 15 minutes
- Once your email is confirmed, your account will be reviewed. You don’t need to do anything at this time and won’t be able to log in but a follow-up email will be sent once your account is approved, at which point you can access the portal and add further plans via the “Add Plan” button
- Once approved, log in and complete the Add Plan form for any additional plans not yet present in your profile